Seeing and Sharing Beauty

Category: Advanced Techniques (Page 2 of 2)

Moon Landscape Photography

Moonlight Beach

“Moonlight Beach”, Moonlight reflections on Cannon Beach, Oregon

As a landscape photographer, I  track the date of the next full moon in the hopes of getting  it into a photographic composition.  If the clouds cooperate, seeing the moon low on the horizon is always a thrill and it can add dramatic interest to a photograph.  I have learned that the shot does not have to be taken on exactly the day of the full moon.  It can be taken  a few days earlier or a few days later and still be what I’m looking for.

I created a mnemonic device to help me remember when to shoot: B-E-A-M.
It stands for

  • BEFORE the full moon date, shoot in the  EVENING toward the east.
    On the days leading up to the full moon date — the BEFORE days — the moon is full-looking and bright and low in the eastern sky right around sunset — in the EVENING — and for a few minutes the sky will be a muted pastel blue, with possible orange sunset light illuminating clouds or objects in the landscape below the moon.
  • AFTER the full moon date, shoot in the MORNING toward the west.
    On the days after the full moon date — the AFTER days — the moon is full-looking and bright and low in the western sky right around sunrise, in the MORNING, and there the sky will be a muted pastel blue, with possible orange, pink, or yellow sunrise light illuminating clouds or objects in the landscape below the moon.

Either occasion makes a  nice tonal composition without the extremes of a too bright moon and a too dark sky.

Moon Moment

“Moon Moment”, Moonset near Millenium Park Tower

B-E-A-M

Before Evening, After Morning

Now it’s easy for me to remember whether I need to get up early or stay out late.

Good luck on shooting the moon!

HDR Software Comparison

I’ve heard and read so much about HDR photography that I wanted to do a quick comparison of the leading software packages – Adobe Photoshop CS4 HDR component, Photomatix Pro 4, and Nik Software HDR Efex Pro.

The image below is my favorite from the three software packages, expressing a light-filled and colorfully fun place, inviting the viewer to come and sit and have a cooling drink with friends.  Read on to see which software package was used to create this image and where it was taken.

Processed in Nik HDR Efex Pro, Default, with 50% Compression, curve adjustment, control points on windows to lower exposure, add structure.

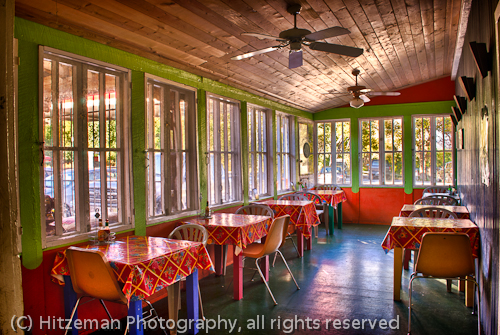
“Bode’s General Store”

For those unfamiliar with High Dynamic Range (HDR) imaging, it is a set of techniques that allow an image to portray a greater range of luminance between its lightest and darkest areas than current standard digital imaging techniques. HDR images can more accurately represent the range of light and shadow levels that the human eye can perceive in real scenes, ranging from direct sunlight to faint starlight.  For reference, a digital camera can record a range of about 5 exposure stops in one scene, while the human eye perceives about 11 exposure stops.

The scene I chose for this comparison was this colorful scene inside Bode’s General Store in Abiquiu, New Mexico.  It contains a range of luminance too great for the camera to record.  It includes light coming in through two walls of windows, and the dark interior shadows beneath the tables.

  • If I set my camera to expose for the window light, the interior shadows are black with no detail.
  • If I set my camera to expose for the interior shadows, the windows are white with no detail.
  • Since I wanted to create a single image with detail in both light and dark areas of the scene, I knew I had to take multiple exposures over a range and combine the images using HDR software.

Below are the three exposures I took of this scene using ISO 100, aperture f/16, at shutter speeds of 1/3 second, 1.3 seconds, and 5 seconds.

A Comparison of the Results

Adobe Photoshop CS4 HDR

Editted in Photoshop CS4 HDR, with additional edits in Lightroom
I found this software to be the most difficult to work with.  Instructions on controls were unclear.  The image coming out was muddy, and required additional processing in Lightroom to bring back color and contrast.  I was still not happy with the results.

Photomatix Pro

Processed in Photomatix Pro 4
To be fair, I only ran this software once, and I need to study it more.  However, I was surprised at how easily it produced a nicely balanced image on the first try.  I did not need make many adjustments.  This is probably the most “realistic” looking interpretation.

Nik HDR Efex Pro

(See image at top of this post.) I liked this software the best for now, mostly because of the understandable interface and the great results.  It also has the greatest control with the ability to edit localized areas of the image using Nik’s control point technology.  I took it a little beyond “realistic” for a more artistic effect.

Conclusion

For now, I recommend Nik HDR Efex Pro, with Photomatix Pro a close second. It may be worth more study to get good with Photomatix Pro. I would forget about Adobe Photoshop CS4’s HDR.  (I have not tried Adobe Photoshop CS5’s HDR, but have read that it’s not that much better than CS4.)

Next time you are in Abiquiu, New Mexico, be sure to visit the 110 year old landmark, Bode’s General Store, and enjoy this colorful place for yourself!

Masterclass :: Wildlife Photography

Assignment: Inspiring Vision

“Photograph wildlife with the aim of inspiring others to share your love of living creatures in the wild.  Use every trick in the book to provide an insight into behavior and to create the most stunning image you can: amazing lighting, dynamic colors, and careful framing.”

— from Digital Photography Masterclass by Tom Ang

Results

Free, American Bald Eagle in Flight

Free, American Bald Eagle in Flight

As a Chicago-based fine art landscape and architectural photographer, I’m used to photographing things that stand still, or at most move no more quickly than the sun or the clouds.  I’m accustomed to having time to think, to visualize the composition, to move around and look for the best light and shadow to realize an image.

So an outing on a cold February Saturday to Lock and Dam No. 14 on the west bank of the Mississippi River near Le Claire, Iowa to photograph eagles in flight was very different from my usual routine.  But hey, shouldn’t everyone have a few eagles in their portfolio?

There was even a guy with a fish slingshot made of 1/2 inch iron pipe and bungee cords to fling bait out in the river to attract the eagles.

My daughter Helena came along on the trip, and she aimed our huge rented 300mm auto-focus lens to track the soaring birds as proficiently as Tom Cruise in the movie Top Gun lining up a Russian fighter jet.

As they say in the Visa commercials …

  • Tank of gas for round trip Naperville, IL to  Le Claire, IA:  $25.00
  • Weekend Rental fee for 300 mm Nikkor Auto-Focus Lens:  $60.00
  • Time with my precious daughter Helena:  Priceless

Tips for Photographing Birds in Flight

  • Shoot RAW format if possible
  • Set to MATRIX EXPOSURE METERING
  • Set to SHUTTER PRIORITY mode, 1/1000th is ideal for flying birds
  • Set to CONTINUOUS AUTO FOCUS
  • Set to AUTO FOCUS AREA / MULTI POINT FOCUS TRACKING
  • Set to CONTINUOUS SHUTTER RELEASE MODE
  • Adjust EXPOSURE COMPENSATION as needed after viewing LCD Histogram

Once your camera is set up correctly, it’s your physical shooting technique that makes the great shots. Channel Tom Cruise!

Assignment: City Lights

“Find a location that offers a variety of colored lights, such as street furniture, shops, restaurants, and offices.  Choose somewhere safe to walk around so that you can concentrate on capturing the brilliance of city lights.”

— from Digital Photography Masterclass by Tom Ang

Results

Open

For this assignment, my goal was to take photos in the “magic evening hour” (the hour before sunset), and in the dark of night, in a city environment, and notice the effect of varying camera settings, exposures, perspectives, and viewpoints.

I almost talked myself out of venturing into “bustling downtown Naperville” on a soggy January Saturday night, initially not too hopeful due to the uninteresting gray sky light just before sunset.  However, as darkness ensued, I began to “see the light” (pun intended) and the benefits of the dark.

Darkness (and the right ISO and aperture settings) allowed for longer exposures, allowing blurring, zooming, seeing light where it is hidden.

Darkness focused the eye on what light there was, allowing seeing things not noticed before in daylight.

Darkness and wet pavements created backlit landscapes where the sun could not.

Darkness allowed underexposing and darkening out the parts of the frame I did not want to record, to emphasize the parts I did.

Below are 8 more images that show some of these concepts.  Enjoy, especially the last one of ducks whose meditation is being interfered with by a crazy night-wandering photographer!

Keep the Lights On

Keep the Lights On

Naperville Night Mural

Naperville Night Mural

Star Stores

Naperville Night Abstract

Line Up

Line Up

Brick Texture

Brick Texture

Glamour Sticks

Glamour Sticks

Meditating Duck

Meditating Ducks

Keeping my word to myself, continuing these Masterclass assignments — even if it looks like the weather is not up to my “expectations” —  is bringing me lots of unexpected FUN!  And with the miraculous warm weather (46 degrees) to keep my fingers from freezing,  and the shimmering wet pavements and puddles to bring out reflections — it’s as if the universe is conspiring to make me HAPPY!  Who knew?

Newer posts »