Seeing and Sharing Beauty

Category: Digital Photography Masterclass (Page 1 of 2)

Masterclass :: Perfecting Your Timing

Assignment: Pet Portrait

“Obtain a telling portrait of a pet animal to convey its character, charm, or features.  If possible, work with an animal that is lively and has an expressive face.  Aim to capture more than the expression or gesture — remember that the composition and lighting should be attractive too.”

— from Digital Photography Masterclass by Tom Ang

Results

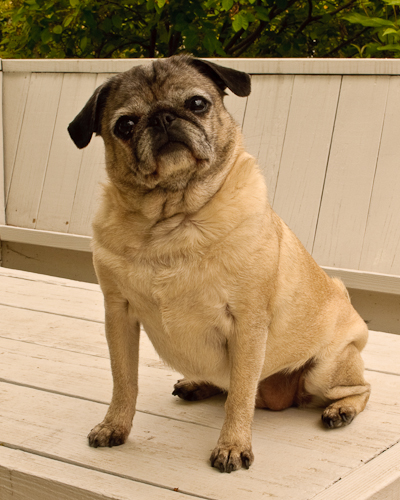
Prada is the name of this pug dog, an energetic, curious, and eventually friendly female.  I did a lot of crawling around on the floor trying to get the shot, but Prada kept coming over and nuzzling against my thigh.  I think she likes me.  I shot this image of her in outdoor light on an overcast day.  I placed her on a table so I could get more on her level, and not be pointing the camera down on her.  And this kept her from wandering around.  Her owner, my daughter Lauren, helped to draw her attention towards the camera.  She seems to be cocking her head, pondering why on earth was I putting her up on this table and pointing this black thing at her?

Prada Pondering

Tips

  • Animals move quickly, and many shots will be blurred unless you use a fast shutter speed and wide aperture.  Skip the auto-focus if possible.  Shots are quicker without it.  My best shots were when Prada was still.
  • Avoid wide open mouth shots of the dog, they look pretty sloppy.
  • The best shots are of the dog looking into the camera.  We want to see her face and eyes.  I read a tip that if you keep a little piece of crinkly cellophane in your hand, and keep your hand near the lens, the animal will look toward it quizzically.

Masterclass :: Mastering Composition

Assignment: Composition on Location

“Imagine that a magazine or website has asked you to illustrate a feature on the techniques of composition and choose a famous landmark as you main subject.  Use every trick in the book to produce an unusual interpretation of a well-known local feature.”

— from Digital Photography Masterclass by Tom Ang

Results

This was fun. I try to “use every trick in the book to produce an unusual interpretation” on all my shoots.  Or should I say, I look around and try to capture something beautiful on all my shoots.

The tricks are not all in a book, though.  I believe they come more from inspiration.

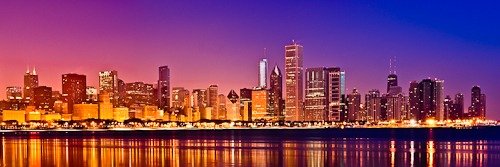
Choosing a single famous landmark for Chicago was something I tried to do and could not.  Sears (now Willis) Tower, the Hancock Building, Navy Pier, Shedd Aquarium, Adler Planetarium, boats, lake sunrises, and on and on.  What’s your favorite Chicago landmark?  What says CHICAGO to me is the Chicago skyline, and I was able to capture it in pre-dawn light, lit by its own city lights glow.

“Chicago North Panorama”, (C) Harry Hitzeman

See this panorama in full screen slide show mode at my Chicago Set on flickr, as well as images from Navy Pier, Ohio Street Beach, North Avenue Beach, and Millennium Park.

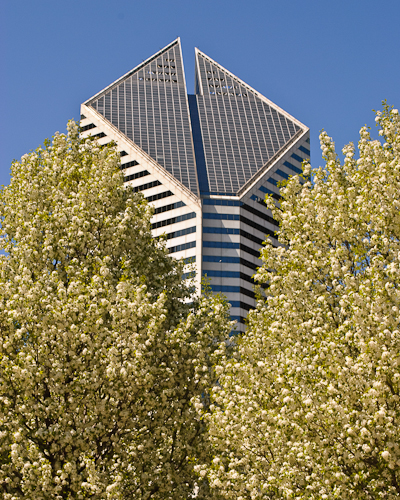
Building Bloom Vertical

“Building Bloom Vertical”, Smurfit-Stone Building, 150 North Michigan Avenue, from Millennium Park, Chicago, Illinois

Masterclass :: Obtaining Ideal Color

Assignment: City Streets

“Working in an urban area where there are plenty of people present, try to capture the busy scene in a balanced, well-composed image.  You can either record a general view, or get in close to take a more intimate shot.  Take advantage of colors and shapes when composing and organizing the shot.”

— from Digital Photography Masterclass by Tom Ang

Result

This assignment was about looking for ways to compose with color and shape in an urban area with people present.  The famous Cloud Gate sculpture in Chicago’s Millennium Park is always surrounded by people.  This image uses a clear blue sky to define the three spikes of buildings poking upwards like asparagus, with a huge silver melon of a sculpture stealing the show in the foreground.

Man’s Vegetable Garden.


Masterclass :: Obtaining the Best Image

Assignment: Urban Nature

“Search for juxtaposition of natural forms against man-made structures and try to record them with the very best quality.  You can work with general views of the environment or in close-up to focus on details that are usually overlooked.”

— from Digital Photography Masterclass by Tom Ang

Result

I have always enjoyed looking at the moon, and as a fine art landscape photographer, I am always looking for ways to create a dramatic photograph with the moon in it.  There are some places where you can shoot the moon setting over a mountain.  Here in Chicago, tall buildings are our mountains.

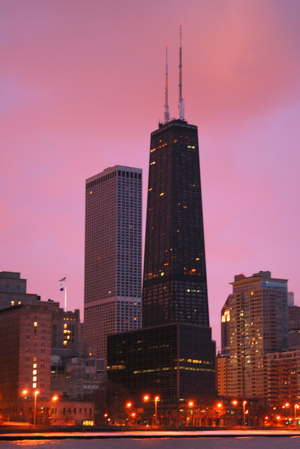
So this morning I had a strategy all laid out for getting a shot of the full moon (nature) in the sky next to Chicago’s John Hancock Building (man-made form).  Using a great program called The Photographer’s Ephemeris, I had calculated that the best time and place to get this shot would be from Olive Park on Chicago’s lakefront, at about 5:00 AM this morning.

This was to be a true “alignment of the planets”.  The several “planets” involved were — the moon, the earth, the John Hancock Building, Olive Park, my camera, and me — all lined up at 5:00 AM to get this shot!

Houston, we have a problem: there’s a blanket of clouds between the moon and the Hancock, and, oh, Olive Park doesn’t open until 7:00 AM.

But it was fun being part of a “moon landing” even though my name isn’t Neil Armstrong.  I still got some nice shots of the Hancock in pre-dawn light, and some other pretty sights along the lakefront.

With nature and landscape photography, make the most of what’s in front of you!

Masterclass :: Tonality and Contrast

Assignment: High Dynamic Range

“Photograph a scene that offers a high dynamic range, exploiting the fact that either the high values will be too white or the shadows too dark.  Compose to work with areas of blackness or whiteness against which the mid-tones can shine.  Don’t make any attempt to control high dynamic range with image manipulation.”

— from Digital Photography Masterclass by Tom Ang

Result

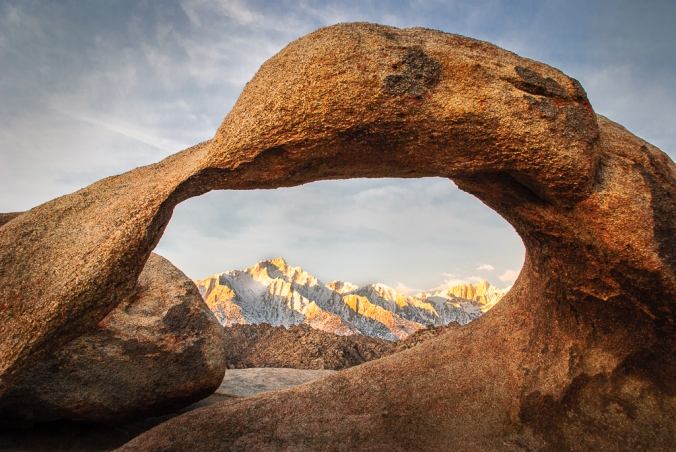
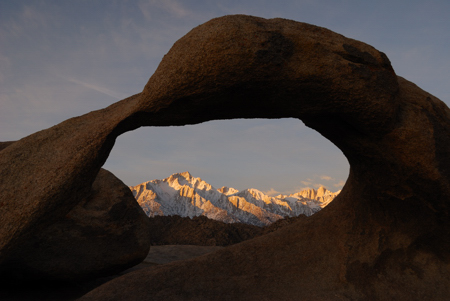
Sierra Gold

Sierra Nevada mountains through arch in the Alabama Hills in Owens Valley, near Lone Pine, California.

View the California Gallery

Before the Peak Moment

This is the straight out of camera, unedited image of the Sierra Nevada mountains looking west at sunrise, just as the first rays of direct sunlight are hitting the snow-capped peaks.  Exposure at ISO 100, shutter speed 1/80s, aperture f/8 ensures that the highlights of the  mountain whites are not over-exposed or blown out.  When unedited, this image leaves some areas of the arch in almost total black darkness.   Just 30 seconds later, the arch was bathed in the morning glow, showing more light and detail in the formerly dark arch.  (View more images of the Sierra Nevada Mountains.)

Commentary / Learnings

This assignment from Tutorial 3 :: Mastering Your Camera :: Tonality and Contrast, was a challenge in that, as a fine art landscape photographer, I normally want to get the entire scene in detail, and avoid areas of total black or total white.  These areas are called “blowouts” where there is zero data to work with during  the editing process, leaving areas of the image or print either totally white or totally black .  As part of the routine of capturing the image,  I always adjust ISO and shutter speed and aperture to expose for the areas of important detail, and often compose the scene to exclude the sky from the frame because of its great brightness.

The learning here for me is that composing the scene and selecting camera settings affecting exposure are all choices, not necessarily absolutes.  What to include or exclude in the composed frame and what exposure choices to use depend on the artist’s vision for the finished print.  Yes, a scene can be “technically” exposed to “correctly” capture the most detail data from dark to light, or it can be exposed for an effect or mood the photographer as artist wants to convey, or to capture detail of the part of the scene of primary importance, and let other parts go to black or white.

My choice has been to capture the clearest image with the most detail possible with the equipment available, and later to make editing choices to create the print that I want to present as an artist.

Now, I am open to also allowing exposures with deep shadows and bright highlights if there’s an artistic reason.

« Older posts